干货!小程序开发,你应该知道的那些事儿:项目工程化与突破最大并发数5
一直负责公司的一个小程序项目开发,到目前为止,一期版本也算完成的差不多了,觉得也是时候从技术的角度对项目作一个小结了,记录踩的一些坑和一些自己觉得的最佳实践吧!关于项目工 ...
一直负责公司的一个小程序项目开发,到目前为止,一期版本也算完成的差不多了,觉得也是时候从技术的角度对项目作一个小结了,记录踩的一些坑和一些自己觉得的最佳实践吧!

关于项目工程化
小程序运行时,会把所有的源代码下载到本地。之后小程序每次运行就像App一样,几乎(除cgi数据,网络图片)全是本地文件IO,而没有网络下载,这也是小程序快的主要原因之一。另外,小程序自带了ES6编译转换,css3样式补全,所以我们基本不需要做任何工程化的事情,因为我们根本不需要合并,打包。JS代码规范,是我们所做的唯一与工程化相关的事了。以下是我们的eslint配置:
//.eslintrc.js
module.exports = {
  "env": {
    "browser": true,
    "node": true,
    "commonjs": true,
    "es6": true
  },
  "globals": {
    "App": true,
    "wx": true,
    "Page": true,
    "getApp": true,
    "getCurrentPages": true
  },
  "extends": "eslint:recommended",
  "parserOptions": {
    "sourceType": "module",
  },
  "rules": {
    // enable additional rules
    // 强制使用一致的缩进
    // "indent": ["error", 2],
    // 要求加上分号
    "semi": ["error", "always"],
    // override default options for rules from base configurations
    // 禁止在条件语句中出现赋值操作符
    "no-cond-assign": ["error", "always"],
    // disable rules from base configurations
    "no-console": "off",
    "no-debugger": 0,
  }
}
关于小程序开发IDE
在小程序官方提供的IDE中,编辑与调试在两个Tab中,切换起来实在麻烦;另外小程序开发工具对Emmet (Zen Coding)不支持...;再加上习惯了自己的开发工具,要一下切到小程序开发工具上,真是不适应;所以我在开发时,小程序开发工具仅用于效果预览与调试,而真正的代码编辑还是使用了自己习惯的IDE,配合双显示器,开发体验与开发H5基本一致。
如果不使用小程序开发工具做代码编辑器,要让.wxml、.wxss支持语法高亮,只需要将.wxml文件设置为html文件类型,而.wxss文件设置为css文件类型。由于不同编辑器设置文件类型的方法不一样,google一下就知道了。
开发时,如何体验小程序
先用管理员账号上传小程序,然后在管理平台上指定此版本为体验版,使用拥有体验权限的微信号扫码就可以体验了。这里有注意:
- 上传代码只有管理员权限才可以
- 小程序开发者默认没有体验权限,必须单独申请
Api提示
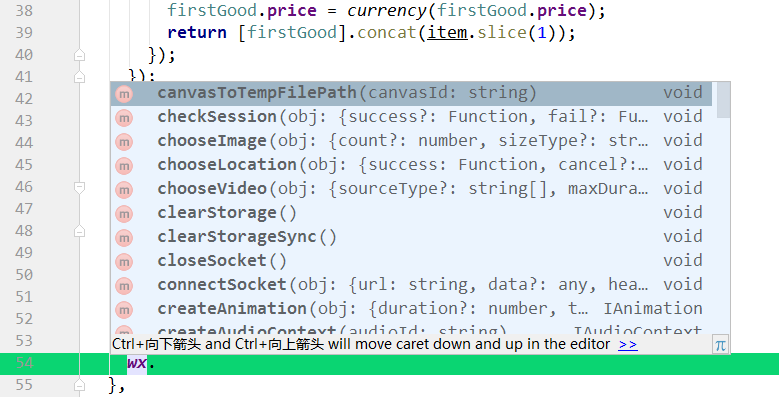
把小程序api定义wx.d.ts放到项目目录中,在编码时,就会有很酷的代码提示

在小程序中使用promise与突破wx.request最大并发数5的限制
从小程官方文档:工具->细节点中,我们可以知道,Promise在ios9中不支持,那么我们使用promise时就需要polyfill。 关于wx.request最大并发数为5的限制问题在官网有提及(地址),但我测试时,没有发现有这个限制,为了保险起见,我们还是做了相应处理。
/**
 * utils/app.js
 * 1. 增加promise支持
 * 2. 突破wx.request最大并发数是5的限制
 */

import { Promise, } from "./promise";
import Helper from "./helper";

// 突破 request 的最大并发数是 5的限制
// refer https://mp.weixin.qq.com/debug/wxadoc/dev/api/network-request.html#wxrequestobject
let RequestMQ = {
  map: {},
  mq: [],
  running: [],
  MAX_REQUEST: 5,
  push(param) {
    param.t = +new Date();
    while ((this.mq.indexOf(param.t) > -1 || this.running.indexOf(param.t) > -1)) {
      param.t += Math.random() * 10 >> 0;
    }
    this.mq.push(param.t);
    this.map[param.t] = param;
  },
  next() {
    let me = this;

    if (this.mq.length === 0)
      return;

    if (this.running.length < this.MAX_REQUEST - 1) {
      let newone = this.mq.shift();
      let obj = this.map[newone];
      let oldComplete = obj.complete;
      obj.complete = (...args) => {
        me.running.splice(me.running.indexOf(obj.t), 1);
        delete me.map[obj.t];
        oldComplete && oldComplete.apply(obj, args);
        me.next();
      };
      this.running.push(obj.t);
      return wx.request_bak(obj);
    }
  },
  request(obj) {
    let me = this;

    obj = obj || {};
    obj = (typeof(obj) === "string") ? { url: obj, } : obj;


    this.push(obj);

    return this.next();
  },
};

function hackRequest() {
  wx["request_bak"] = wx["request"];
  Object.defineProperty(wx, "request", {
    get() {
      return (obj) => {
        obj = obj || {};
        obj = (typeof(obj) === "string") ? { url: obj, } : obj;
        return new Promise((resolve, reject) => {
          obj.success = resolve;
          obj.fail = (res) => {
            if (res && res.errMsg) {
              reject(new Error(res.errMsg));
            } else {
              reject(res);
            }
          };
          RequestMQ.request(obj);
        });
      };
    },
  });
}

// 增加promsie支持
function addPromise() {
  let noPromiseMethods = {
    stopRecord: true,
    pauseVoice: true,
    stopVoice: true,
    pauseBackgroundAudio: true,
    stopBackgroundAudio: true,
    showNavigationBarLoading: true,
    hideNavigationBarLoading: true,
    createAnimation: true,
    createContext: true,
    createCanvasContext: true,
    hideKeyboard: true,
    stopPullDownRefresh: true,
  };
  Object.keys(wx).forEach((key) => {
    if (!noPromiseMethods[key] && key.substr(0, 2) !== "on" && key !== "request" && !(/\w+Sync$/.test(key))) {
      wx[key + "_bak"] = wx[key];
      Object.defineProperty(wx, key, {
        get() {
          return (obj) => {
            obj = obj || {};
            //obj = (typeof(obj) === 'string') ? {url: obj} : obj;
            return new Promise((resolve, reject) => {
              obj.success = resolve;
              obj.fail = (res) => {
                if (res && res.errMsg) {
                  reject(new Error(res.errMsg));
                } else {
                  reject(res);
                }
              };
              wx[key + "_bak"](obj);
            });
          };
        },
      });
    }
  });
}

export default function createApp(config) {
  addPromise();
  hackRequest();

  let helper = Helper.$extend({}, Helper, {
    Promise,
  });
  return Helper.$extend({}, config, {
    helper,
  });
}
// app.js启动小程序
import createApp from "./utils/app";

App(createApp({
  data: {},
  Events: {},
  onLaunch() {
    // console.log(wx.login());
    // Do something initial when launch.
  },
});
小程序在Android机上面拉取不到数据,而在IOS上可以
遇到这个问题,多半是https版本或证书有问题,找后台或运维解决。
使用weui-wxss,wept
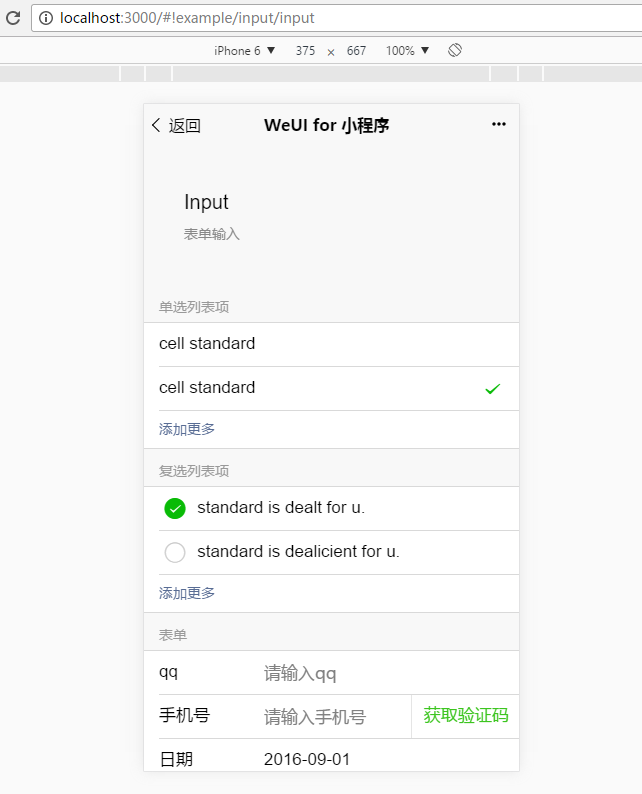
weui-wxss 是官方提供的一些常用组件,可以根据情况是否使用。这里主要想说的是,从github下载weui-wxss源码后,要使用dist作为小程序项目根目录。在预览组件效果时,来回切换项目十分麻烦,这时候我推荐 wept 这个浏览器环境的小程序运行工具来帮帮助我们预览。

页面样式
页面样式,要使用Page这个元素元素器,则不是.page class选择器。如:
/*所有页面初始设置*/
page {
  color: #333;
  height: 100%;
  font-size: 28rpx;
  line-height: 1.5;
  background-color: #f2f2f2;
}
关于下拉刷新
下拉刷新最好不要在全局开启,而是在具体的页面开启。另外在具体页面只能配置window下面的属性,所以不需要再写window。下面的配置是**此页面的下拉刷新和设置页面标题:
{
  "enablePullDownRefresh": true,
  "navigationBarTitleText": "小程序"
}
小程序文件引用路径
- js中:只能通过"import RefresherPlugin from '../../plugins/refresher';"这种方式引用,不能省略".."
- wxss和wxml中:可以使用/root/path的方法引用文件,如
/*引用样式*/
@import '/components/loading/loading.wxss';

<!--引用wxml-->
<import src="/components/loadmore/loadmore.wxml" />

<!--wxml中引用图片-->
<image class="icon" src="/images/category.png" mode="aspectFill" />
图片预览(图片查看器)
小程序提供了wx.previewImage方法来预览图片,所有不需要再实现图片查看器
wx.previewImage({
  urls: this.data.swiper.imgUrls
});
巧用pages配置方便开发
app.json中pages选项的第一个页面即小程序的入口页面。因此把当前开发页面配置成第一个页面,可以方便我们预览。
指定页面path
指定页面path一定要使用“/”开头:
wx.navigateTo({
  url: '/pages/goods/search/search'
});
<navigator url="/pages/goods/detail/detail?gid={{goods[0].id}}" hover-class="weui-cell_active">
    <template is="goodsListItem" data="{{goods: goods[0]}}"></template>
</navigator>
在block标签上使用控制指令
block标签在官方文档中没有怎么提及,刚开始时甚至都不知道有这个标签。由于
<!--循环列表-->
<block wx:for="{{history}}" wx:for-item="item" wx:key="*this">
    <view class="search__history-list-item g-wto" catchtap="clickSearch" data-key="{{item}}">{{item}}</view>
</block>

<!--条件选择-->
<block wx:if="{{isOrder}}">
  <!--...-->
</block>
<block wx:else >
  <!--...-->
</block>
template vs include
先看使用方法:
<!--template使用-->

<!--/components/nodata/nodata.wxml中定义nodata template-->
<template name="nodata">
  <view class="c-no-data" hidden="{{hidden}}">
    <view class="content">
      <image class="icon" src="{{icon}}" mode="widthFix" />
      <view class="label">{{msg || '没有数据'}}</view>
    </view>
  </view>
</template>

<!--template使用-->
<import src="/components/nodata/nodata.wxml" />
<template is="nodata" data="{{icon:'/images/empty2.png', hidden: empty, msg: '数据为空'}}"></template>

<!--include使用-->
<view class="p-search">
  <include src="/components/search/search.wxml" />
</view>
- template必须先定义,再使用
- template具有作用域,只能使用data中传入的数据
- include是把wxml中的内容引入到使用include的位置,数据直接页面数据
- 对于复杂的组件,为了方便数据控制,include可能比template更好用
善于使用mixin方式开发页面
Page在启动时,要求传入一个配置对象。这个配置对象的某些属性会在页面具体的生命周期中执行,比如onLoad, onShow...等。
// 官方页面注册
Page({
  data: {
    text: "This is page data."
  },
  onLoad: function(options) {
    // Do some initialize when page load.
  },
  onReady: function() {
    // Do something when page ready.
  },
  onShow: function() {
    // Do something when page show.
  },
  onHide: function() {
    // Do something when page hide.
  },
  onUnload: function() {
    // Do something when page close.
  },
  onPullDownRefresh: function() {
    // Do something when pull down.
  },
  onReachBottom: function() {
    // Do something when page reach bottom.
  },
  onShareAppMessage: function () {
   // return custom share data when user share.
  },
  // Event handler.
  viewTap: function() {
    this.setData({
      text: 'Set some data for updating view.'
    })
  },
  customData: {
    hi: 'MINA'
  }
});
如果我们抽象一些公共mixin,则页面的注册就会像下面的样子:
import { $extend } from '../../../utils/helper';
import Search from '../../../components/search/search';
import { SEARCH_CACHE_KEY } from '../../../config/index';

Page($extend({
  onLoad() {
    this.init({
      cacheKey: SEARCH_CACHE_KEY,
      cgi: queryOrders,
      isOrder: true
    });
  }
}, Search));
使用小程序全局数据
var appInstance = getApp()

// 读
console.log(appInstance.globalData) // I am global data

// 写
appInstance.newKey = 'new value';
小程序事件
绑定方式
小程序事件绑定有bind或catch两种开头,然后跟上事件的类型,如bindtap, catchtouchstart。区别是:bind事件绑定不会阻止冒泡事件向上冒泡,catch事件绑定可以阻止冒泡事件向上冒泡。建议使用catch绑定事件。
<view class="search-head">
<view class="search-head__input">
  <icon type="search" size="15" class="icon"></icon>
  <icon type="clear" hidden="{{!showClear}}" size="15" class="clear" catchtap="clearKeyword"></icon>
  <input id="input" class="search-head__input-input" type="text"
         placeholder="搜索"
         placeholder-class="search-head__input-ph" value="{{keyword}}" focus="{{true}}"
         bindinput="keywordInput"
         bindconfirm="doSearch" />
</view>
<view class="search-head__cancel" catchtap="goHome">取消</view>
</view>
dataset
- 可以通过dataset在事件处理函数中传递参数。
- 一个标签上可以写多个dataset
<block wx:for="{{filters}}" wx:key="{{filter.name}}" wx:for-item="filter" wx:for-index="idxi">
  <view class="m-detail__size">
    <view class="label m-detail__size-label">{{filter.name}}</view>
    <view class="m-detail__size-wrap">
      <block wx:for="{{filter.value}}" wx:key="*this" wx:for-item="item" wx:for-index="idxj">
        <block wx:if="{{item.enable}}">
          <view class="m-detail__size-item {{item.selected ? 'selected' : ''}}"
                data-target="{{item}}"
                data-i="{{idxi}}"
                data-j="{{idxj}}"
                data-selected="{{item.selected}}"
                data-enable="{{item.enable}}"
                catchtap="doFilter">{{item.value}}</view>
        </block>
      </block>
    </view>
  </view>
</block>
doFilter(e) {
    let target = e.target.dataset.target;
    let selected = e.target.dataset.selected;
    let enable = e.target.dataset.enable;
    let i = ~~(e.target.dataset.i);
    let j = ~~(e.target.dataset.j);
    let value = target.value;

    //...
}
以下的dataset写法都会报错,与常见的mvvm中传值还是有区别:
data-j="{{idxj: idxj}}"
data-j="{{idxj, idxi}}"
尺寸请使用rpx
rpx是小程序提供的一种新的尺寸单位,相比于px,rpx具有更好的兼容性。
小程序中路径的使用(更新于2017年3月12日)
-
js中:只能通过"import RefresherPlugin from '../../plugins/refresher';"这种方式引用,不能省略".."
-
wxss和wxml中:可以使用/root/path/file.ext的方法引用文件,如
/*引用样式*/
@import '/components/loading/loading.wxss';

<!--引用wxml-->
<import src="/components/loadmore/loadmore.wxml" />

<!--wxml中引用图片-->
<image class="icon" src="/images/category.png" mode="aspectFill" />


