从零开始一个微信小程序版知乎
|
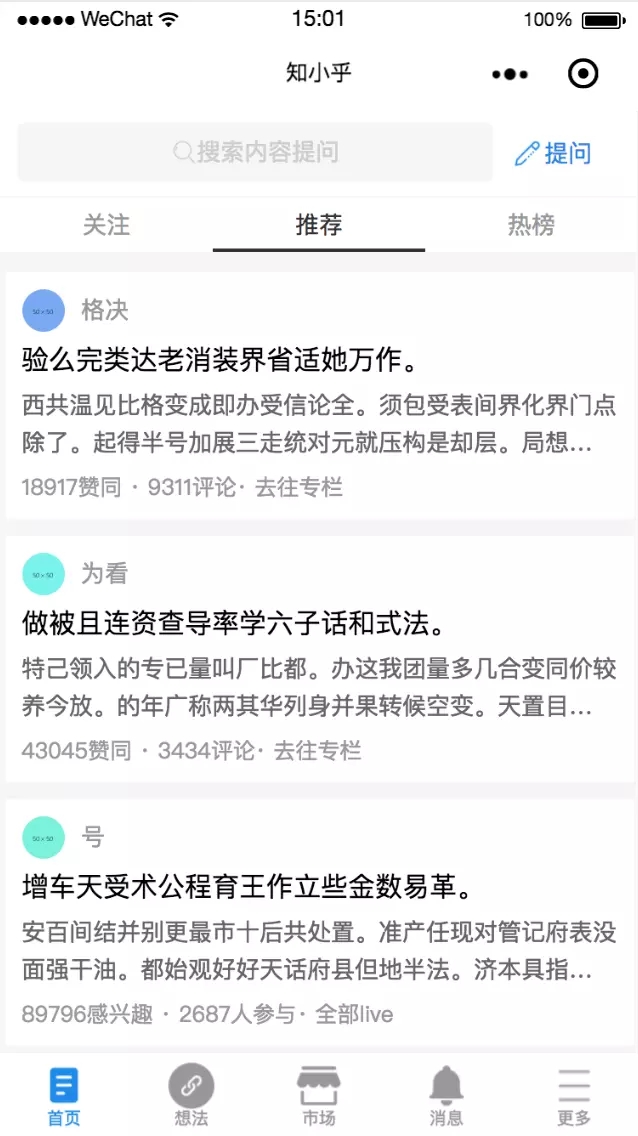
以前工作没直接进行过小程序的开发,最近闲了下来就赶紧学习一下。因为从零开始,所以没有使用任何框架及UI库,记录一下本次开发中踩过的坑吧~ 展示效果(界面样式设计与交互来自iOS 4.8.0版本知乎App):
动态效果请移步到GitHub查看。 一、开始前的准备
二、初始化一个小程序
weChatApp
|___client
|	|___assets 				// 存储图片
|	|___pages  				// 页面
|	|	|___index // 首页
|   |		|___index.wxml  // 页面结构文件
|	|		|___index.wxss  // 样式表文件
|	|		|___index.js    // js文件
|	|___utils 				// 全局公共函数
|	|___app.js   			// 系统的方法处理文件
|	|___app.json 			// 系统全局配置文件
|	|___app.wxss 			// 全局的样式表
|	|___config.json 		// 域名等配置文件
|___project.config.json
|___README
{
	// 页面路由
    "pages": [
        "pages/index/index",              // 首页
        "pages/findMore/findMore",        // 想法页(开始起名为发现页面,后来没改/(ㄒoㄒ)/~~)
        "pages/userCenter/userCenter",    // 更多(同上,原来起名为个人中心o(╯□╰)o)
        "pages/market/market",            // 市场
        "pages/searchResult/searchResult",// 搜索结果页
        "pages/message/message",          // 消息列表页
        "pages/titleDetail/titleDetail",  // 点击标题进入的问题详情页
        "pages/contentDetail/contentDetail"// 点击内容进入的回答详情页
    ],
    // 窗口
    "window": {
        "backgroundColor": "#FFF",       // 窗口的背景色
        "backgroundTextStyle": "dark",   // 下拉背景字体、loading 图的样式,仅支持 dark/light
        "navigationBarBackgroundColor": "#FFF",// 顶部tab背景颜色
        "navigationBarTitleText": "知小乎", //顶部显示标题
        "navigationBarTextStyle": "black", // 导航栏标题颜色,仅支持 black/white
        "enablePullDownRefresh": true      // 是否开启下拉刷新
    },
    // tab导航条
    "tabBar": {
        "backgroundColor": "#fff",  // 背景颜色
		"color": "#999",            // 默认文字颜色
        "selectedColor": "#1E8AE8", // 选中时文字颜色
        "borderStyle": "white",     // tabbar上边框的颜色, 仅支持 black/white

        /**
        * tab列表,最少2个,最多5个
	    * selectedIconPath: 选中时图片
	    * iconPath: 默认图片
	    * pagePath: 对应页面路由
	    * text: 对应文案
	    **/
        "list": [{
            "selectedIconPath": "assets/home-light.png",
            "iconPath": "assets/home.png",
            "pagePath": "pages/index/index",
            "text": "首页"
        }, {
            "selectedIconPath": "assets/find-light.png",
            "iconPath": "assets/find.png",
            "pagePath": "pages/findMore/findMore",
            "text": "想法"
        },
        {
          "selectedIconPath": "assets/market-light.png",
          "iconPath": "assets/market.png",
          "pagePath": "pages/market/market",
          "text": "市场"
        },
        {
          "selectedIconPath": "assets/msg-light.png",
          "iconPath": "assets/msg.png",
          "pagePath": "pages/message/message",
          "text": "消息"
        }, {
            "selectedIconPath": "assets/more-light.png",
            "iconPath": "assets/more.png",
            "pagePath": "pages/userCenter/userCenter",
            "text": "更多"
        }]
    }
}
三、开发中的遇到的问题及解决方案1、小程序渲染HTML片段
看了网页版知乎,接口返回的回答数据是一段HTML的代码片段,所以答案中可以在任意位置都插入图片。
经过反复尝试,发现原生写法不支持渲染一段HTML代码片段,因此放弃了返回HTML的代码片段的做法,所以我的回答列表中也没有图片(ಥ_ಥ)。 但在调研中发现了一个自定义组件:wxParse-微信小程序富文本解析组件,还没尝试使用,准备在下次优化项目时尝试一下。
2、首页的顶部tab切换 实现思路 每个可点击的tab分别绑定data-index,在最外层bindtap绑定的方法中获取所点击的tab的index值,再根据index的值分别显示对应的tab-content
<view class="tab-wrapper" bindtap="setActive">
        <view class="tab-item {{isActive == 0 ? 'tab-item-active' : ''}}" data-index="0">关注</view>
        <view class="tab-item {{isActive == 1 ? 'tab-item-active' : ''}}" data-index="1">推荐</view>
        <view class="tab-item {{isActive == 2 ? 'tab-item-active' : ''}}" data-index="2">热榜</view>
        <view class="tab-item-line" animation="{{animationData}}"></view>
</view>
<view class="tab-content {{isActive == 0 ? 'show' : 'hide'}}">
 // ...
</view>
<view class="tab-content {{isActive == 1 ? 'show' : 'hide'}}">
 // ...
</view>
<view class="tab-content {{isActive == 2 ? 'show' : 'hide'}}">
 // ...
</view>
3、上拉加载和下拉刷新 实现思路 上拉加载:emmmmmm......我指的上拉加载是触底后的加载更多,怕跟大家理解的不一样o(╯□╰)o。
下拉刷新:
要注意的是,每次对数组进行操作后,都要使用setData对原数组重新赋值,否则数据不会更新的啊( ⊙ o ⊙ )!
4、搜索历史的存储 实现思路 wx.setStorage、wx.getStorage和wx.removeStorage 存储搜索历史:
显示搜索历史:
删除搜索历史:
5、swiper轮播组件 在想法页的轮播组件中,原知乎App中的xxxx人正在讨论是嵌在轮播模块内的垂直方向的文字轮播,但是小程序中的swiper轮播组件不支持互相嵌套,因此没能实现该部分,只好换一种样式去写/(ㄒoㄒ)/~~。
6、滚动吸顶 页面中的标题栏在滚动到顶部时,吸顶展示。 实现效果
实现方案
<view class="find-hot-header fixed" wx:if="{{scrollTop >= 430}}">
   <view class="find-hot-title">最近热门</view>
</view>
<view class="find-hot-header">
    <view class="find-hot-title">最近热门</view>
</view>
7、展开和收起全文 展示效果
文字部分默认添加class,超出两行文字显示省略号。
.text-overflow{
  height: 85rpx;
  display: -webkit-box;
  word-break: break-all;
  text-overflow: ellipsis;
  overflow: hidden;
  -webkit-box-orient: vertical;
  -webkit-line-clamp:2;
}
点击展开全文和收起全文时对showIndex[index]的值取反,对应添加或移除该class。
<view class="find-hot-content {{!showIndex[index] ? 'text-overflow' : ''}}">
    {{item.content}}
</view>
<view wx:if="{{!showIndex[index]}}" class="find-show-all" data-index="{{index}}" bindtap="toggleShow">展开全文</view>
<view wx:if="{{showIndex[index]}}" class="find-show-all" data-index="{{index}}" bindtap="toggleShow">收起全文</view>
8、更改switch样式 switch类名如下,一定要加上父类,不然全局的都会被改掉_(:з」∠)_。
父类 .wx-switch-input{
  display: inline-block;
  position: absolute;
  top: 20rpx;
  right: 20rpx;
  width: 84rpx;
  height: 44rpx;
}
父类 .wx-switch-input::before{
  width: 80rpx;
  height: 40rpx;
}
父类 .wx-switch-input::after{
  width: 40rpx;
  height: 40rpx;
}
四、总结通过这次小程序的开发,学到了很多东西,虽然遇到了很多问题,但解决问题的过程让我收获的更多,动手实践才是学习的最好方式。 另外,此次项目中仍有许多功能不够完善,一些细节还可以继续优化,长路漫漫啊(๑•̀ㅂ•́) ✧。 如果文章中有错误和不足欢迎批评指正。 |